skip to main |
skip to sidebar
 Last summer I searched high and low to find a live topiary. I finally found one at Home Depot no less! The tag on the beautiful little tree/shrub/plant said it derived from Australia. I over watered it. Then I under watered it. Until finally, all the leaves shriveled up and fell off. I had finally killed the poor thing.
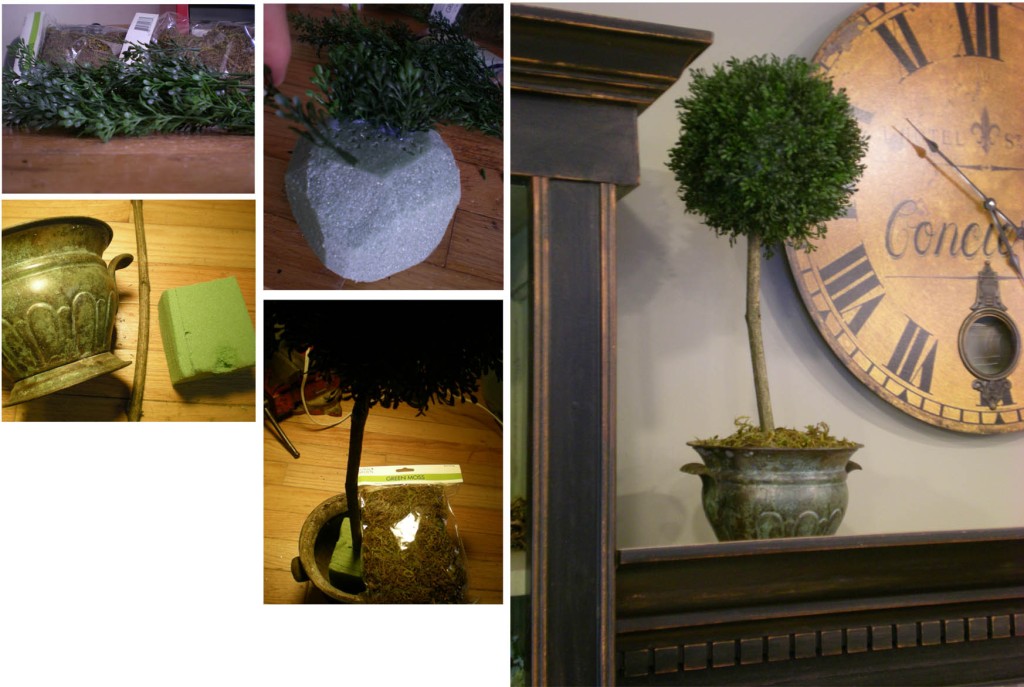
My next quest was to find a really good fake. They are around in stores... a nice one can be pricey... and I would have most likely purchased one or two if I hadn't read a great tutorial on how to make your own, by 320 Sycamore. She's very creative, you will definately love her blog! Filled with design projects turning junk into treasures. So above is my version. I purchased foam balls, green moss and glue sticks at the dollar store. The green leaf bunch was purchased from Michales for maybe a couple dollars. All together the project took an afternoon and the cost was under $5 using a pot I already had. Cut the "trunk" from a tree branch in the yard, you can even add a little grape vine to wrap around it adding texture! Isn't it cute?
So easy to do. Start with a round green foam ball (I started with a square and rounded the edges with a knife). First you need to remove the leaves from the stem that forms the bunch. Then, tear your leaf sections in half so that each measures roughly an inch or so long? I used the stem to poke holes in my ball and then dipped each leaf section into hot glue and inserted. As you are close to covering the entire ball, poke a hole in the open space of the ball with your branch (trunk). Put hot glue on the tip of the branch and insert it into the hole. I then hot glued the square foam into my vase. Repeated the process with the branch inserting it into the vase foam with hot glue. To finish, add green moss to the top (no glue necessary, it should just stay in place).
 Last summer I searched high and low to find a live topiary. I finally found one at Home Depot no less! The tag on the beautiful little tree/shrub/plant said it derived from Australia. I over watered it. Then I under watered it. Until finally, all the leaves shriveled up and fell off. I had finally killed the poor thing.
No comments:
Post a Comment
Hi, thanks for visiting!